Hi, I’m Mehedi H Masum, a certified Web Analyst and Web Designer with expertise in GA4, GTM, and Server-Side Tracking. I help businesses optimize their analytics and create impactful designs. Let’s work together to elevate your digital presence!
Why & How to Set Up Google Ads Enhanced Conversions
Accurate conversion tracking is essential for optimizing your Google Ads campaigns. If you’re looking for a way to enhance your tracking accuracy and improve data reliability, Google Ads Enhanced Conversions is the solution you need.
In this blog post, we’ll cover:
✅ What Google Ads Enhanced Conversions are ✅ How they function ✅ Why they are crucial for conversion tracking ✅ How to set them up using Google Tag Manager (GTM)
🔍 What Are Enhanced Conversions in Google Ads?
Enhanced Conversions is a feature that improves conversion tracking accuracy by supplementing existing conversion tags with securely hashed first-party customer data.
When a user clicks on an ad and completes a key action—such as filling out a form, making a purchase, or engaging with your website—Enhanced Conversions help track and attribute these actions more precisely.
This feature ensures better data accuracy while adhering to strict privacy and security measures.
🔄 How Do Enhanced Conversions Work?
When a user completes a conversion on your website, key details like their email, phone number, or address can be captured by your conversion tracking tags.
Here’s how Enhanced Conversions work:
The user submits their details through a form or checkout page.
The data is hashed using SHA256, a secure one-way encryption algorithm, before being sent to Google.
Google matches this hashed data with signed-in Google accounts to attribute conversions accurately.
The advertiser gains better insights into conversion data while ensuring user privacy and compliance.
This process helps advertisers track conversions more effectively, particularly when using privacy-first browsers and tracking restrictions.
🛠 How to Set Up Enhanced Conversions via Google Tag Manager (GTM)
Setting up Enhanced Conversions in Google Tag Manager is a straightforward process. Follow these key steps:
1️⃣ Enable Enhanced Conversions in Google Ads
Log in to Google Ads and go to Tools & Settings → Conversions.
Select the conversion action you want to enhance.
Under Settings, enable Enhanced Conversions.
2️⃣ Modify Your Google Ads Conversion Tag in GTM
Open Google Tag Manager.
Navigate to your existing Google Ads Conversion Tag.
Under Tag Configuration, enable Enhanced Conversions.
3️⃣ Capture Customer Data
Add variables to collect first-party data (such as email, phone, and name).
Use GTM Data Layer Variables or CSS Selectors to extract and store the data.
4️⃣ Send Hashed Data to Google
Google automatically hashes the data using SHA256 encryption before sending it for matching.
5️⃣ Test & Verify Your Setup
Use Google Ads Tag Assistant or GTM Preview Mode to ensure that your data is being sent correctly.
Once the setup is complete, Google will use this hashed data to attribute conversions more accurately, helping you optimize your campaigns with better data insights.
🚀 Benefits of Using Enhanced Conversions
By implementing Enhanced Conversions, you can: ✅ Improve conversion attribution by bridging gaps in data tracking. ✅ Enhance campaign performance with more accurate reporting. ✅ Maintain privacy compliance with secure SHA256 hashing. ✅ Adapt to tracking limitations in a cookieless digital landscape.
🎯 Final Thoughts
If you’re running Google Ads and looking to enhance conversion tracking accuracy, implementing Enhanced Conversions via Google Tag Manager is a must. This feature not only improves data accuracy but also ensures privacy-first tracking.
Have you set up Enhanced Conversions for your campaigns? Let’s discuss in the comments! 🚀
How to Track WPForms in GA4 Through Google Tag Manager
Tracking WPForms submissions on your WordPress website can be tricky, especially if you’re new to Google Analytics 4 (GA4) and Google Tag Manager (GTM). But don’t worry—this guide will walk you through the entire process, step by step, using an AJAX listener for precise tracking.
Table of Contents
Assumptions
Determining the Right Method
Using the AJAX Listener Method
Setting Up a Custom Trigger for WPForms
Extracting the WPForms ID
Creating the GA4 Event Tag
Setting Up Custom Dimensions in GA4
Testing Your Setup
1. Assumptions
Before you begin, we assume the following:
You’ve installed GA4 on your website using GTM.
You’re familiar with creating tags, triggers, and variables in GTM. If not, review a beginner’s tutorial on GTM before proceeding.
2. Determining the Right Method
The tracking method depends on how your form behaves upon submission:
If the page doesn’t refresh: Your form uses AJAX. Follow the AJAX method described here.
If the page refreshes: You can use GA4’s built-in form tracking or the Form Submission trigger in GTM.
3. Using the AJAX Listener Method
This method uses a custom HTML tag in GTM to listen for AJAX events and push the data into the Data Layer. Here’s how:
Step 1: Add the AJAX Listener Code
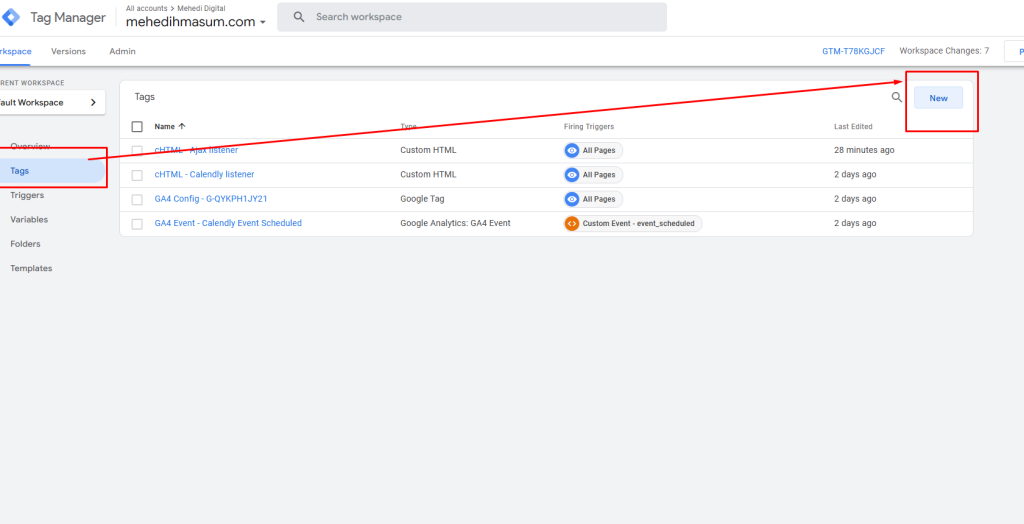
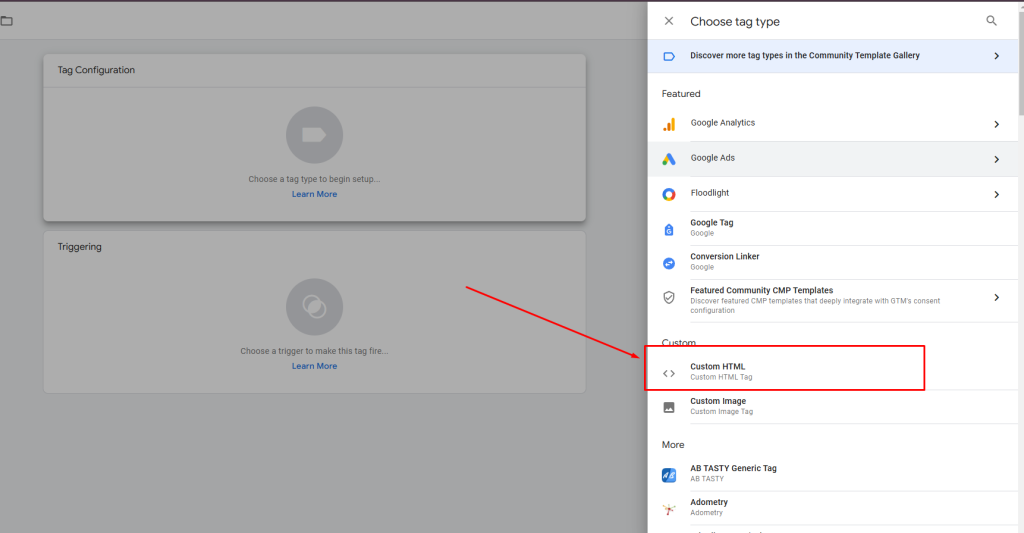
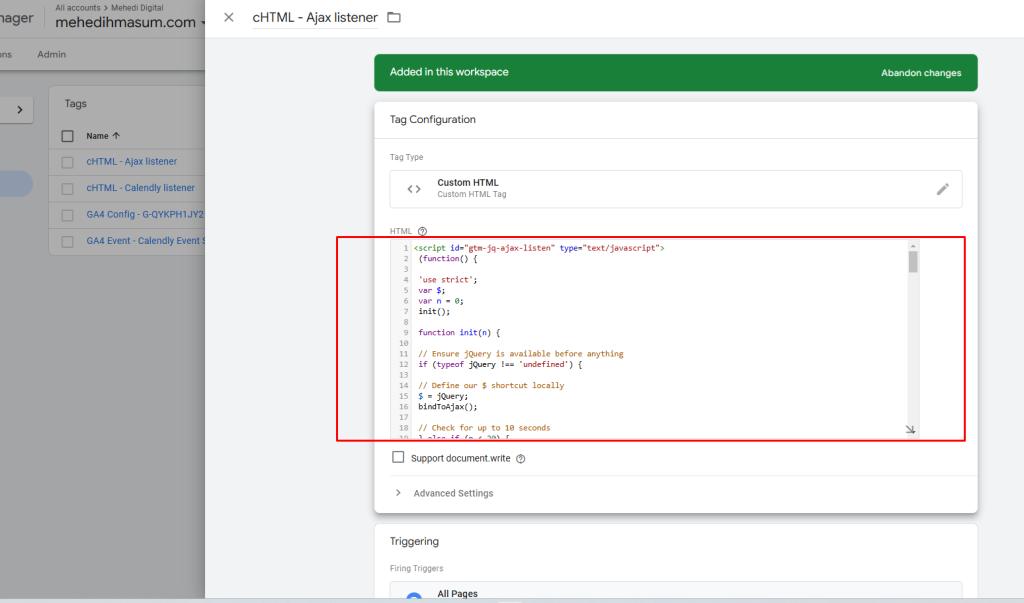
In GTM, create a new Custom HTML tag. Paste the following AJAX listener code:
<script id="gtm-jq-ajax-listen" type="text/javascript">
 (function() {

 'use strict';
 var $;
 var n = 0;
 init();

 function init(n) {

 // Ensure jQuery is available before anything
 if (typeof jQuery !== 'undefined') {

 // Define our $ shortcut locally
 $ = jQuery;
 bindToAjax();

 // Check for up to 10 seconds
 } else if (n < 20) {

 n++;
 setTimeout(init, 500);

 }

 }

 function bindToAjax() {

 $(document).bind('ajaxComplete', function(evt, jqXhr, opts) {

 // Create a fake a element for magically simple URL parsing
 var fullUrl = document.createElement('a');
 fullUrl.href = opts.url;

 // IE9+ strips the leading slash from a.pathname because who wants to get home on time Friday anyways
 var pathname = fullUrl.pathname[0] === '/' ? fullUrl.pathname : '/' + fullUrl.pathname;
 // Manually remove the leading question mark, if there is one
 var queryString = fullUrl.search[0] === '?' ? fullUrl.search.slice(1) : fullUrl.search;
 // Turn our params and headers into objects for easier reference
 var queryParameters = objMap(queryString, '&', '=', true);
 var headers = objMap(jqXhr.getAllResponseHeaders(), '\n', ':');

 // Blindly push to the dataLayer because this fires within GTM
 dataLayer.push({
 'event': 'ajaxComplete',
 'attributes': {
 // Return empty strings to prevent accidental inheritance of old data
 'type': opts.type || '',
 'url': fullUrl.href || '',
 'queryParameters': queryParameters,
 'pathname': pathname || '',
 'hostname': fullUrl.hostname || '',
 'protocol': fullUrl.protocol || '',
 'fragment': fullUrl.hash || '',
 'statusCode': jqXhr.status || '',
 'statusText': jqXhr.statusText || '',
 'headers': headers,
 'timestamp': evt.timeStamp || '',
 'contentType': opts.contentType || '',
 // Defer to jQuery's handling of the response
 'response': (jqXhr.responseJSON || jqXhr.responseXML || jqXhr.responseText || '')
 }
 });

 });

 }

 function objMap(data, delim, spl, decode) {

 var obj = {};

 // If one of our parameters is missing, return an empty object
 if (!data || !delim || !spl) {

 return {};

 }

 var arr = data.split(delim);
 var i;

 if (arr) {

 for (i = 0; i < arr.length; i++) {

 // If the decode flag is present, URL decode the set
 var item = decode ? decodeURIComponent(arr[i]) : arr[i];
 var pair = item.split(spl);

 var key = trim_(pair[0]);
 var value = trim_(pair[1]);

 if (key && value) {

 obj[key] = value;

 }

 }

 }

 return obj;

 }

 // Basic .trim() polyfill
 function trim_(str) {

 if (str) {

 return str.replace(/^[\s\uFEFF\xA0]+|[\s\uFEFF\xA0]+$/g, '');

 }

 }


 })();
 /*
 * v0.1.0
 * Created by the Google Analytics consultants at http://www.lunametrics.com
 * Written by @notdanwilkerson
 * Documentation: http://www.lunametrics.com/blog/2015/08/27/ajax-event-listener-google-tag-manager/
 * Licensed under the Creative Commons 4.0 Attribution Public License
 */
</script>
Step 2: Configure the Trigger
Option 1: Use the built-in All Pages trigger.
Option 2: Create a new Page View trigger for specific pages where the form exists.
Save the tag as “Custom HTML – AJAX Listener.”
Step 3: Test the Listener
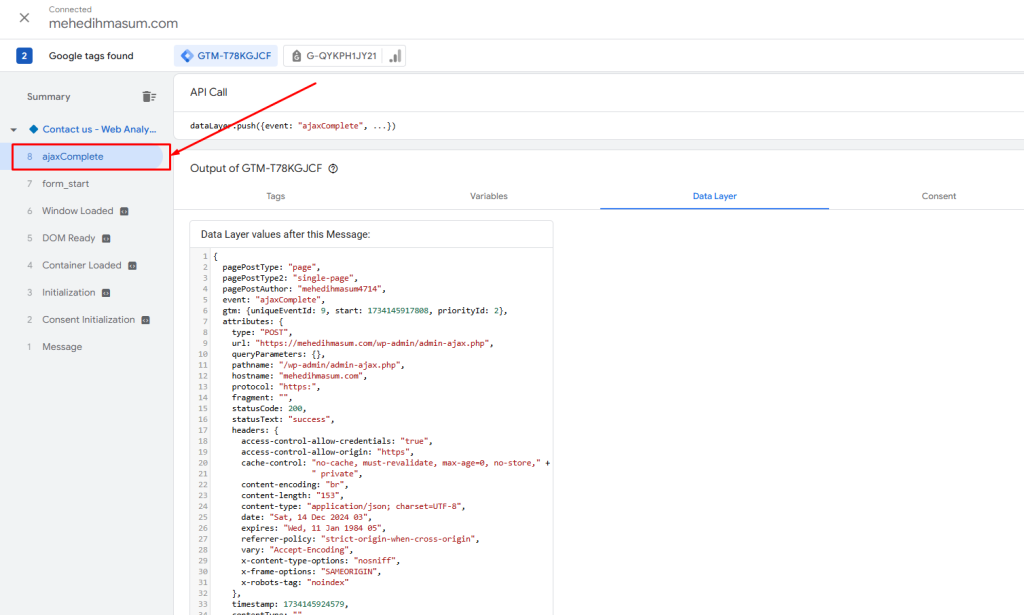
Preview your GTM container and submit a WPForm. Look for the ajaxComplete event in the GTM Preview Mode’s Data Layer tab.
4. Setting Up a Custom Trigger for WPForms
Step 1: Identify WPForms-Specific Data
In the GTM Preview mode, look for the ajaxComplete event.
Expand its attributes and find the response.data.confirmation parameter. This often contains a unique string, like wpforms-confirmation.
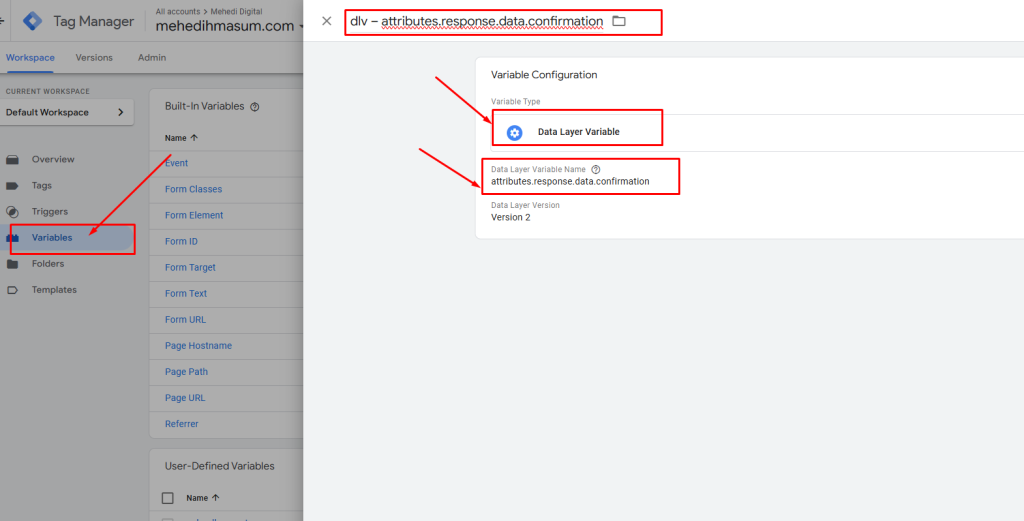
Step 2: Create a Data Layer Variable
Go to Variables > New > Data Layer Variable.
Set the variable name to attributes.response.data.confirmation and save it as dlv – attributes.response.data.confirmation
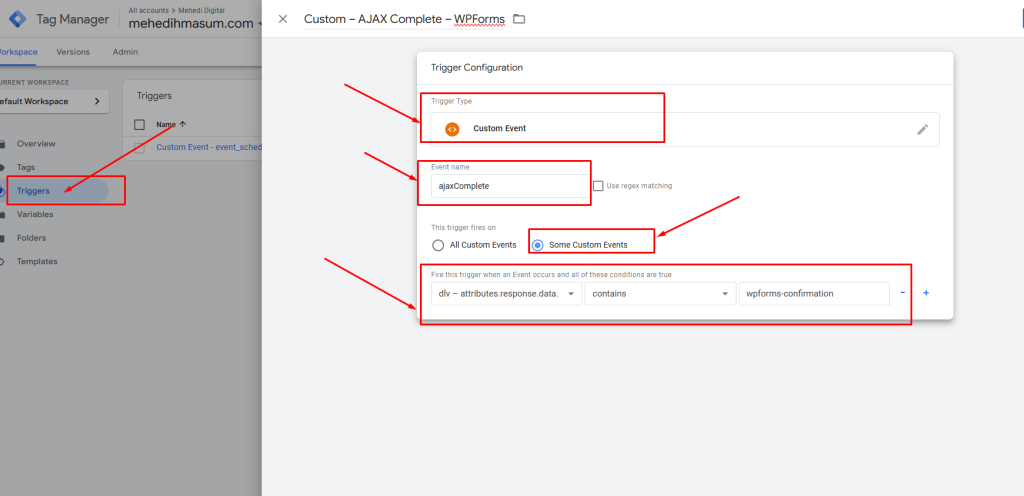
Step 3: Create a Custom Trigger
Go to Triggers > New > Custom Event.
Set the event name to ajaxComplete.
Add a condition: dlv – attributes.response.data.confirmation contains wpforms-confirmation.
Save the trigger as “Custom – AJAX Complete – WPForms.”
5. Extracting the WPForms ID
You can extract the WPForms ID to analyze submissions by form. Here’s how:
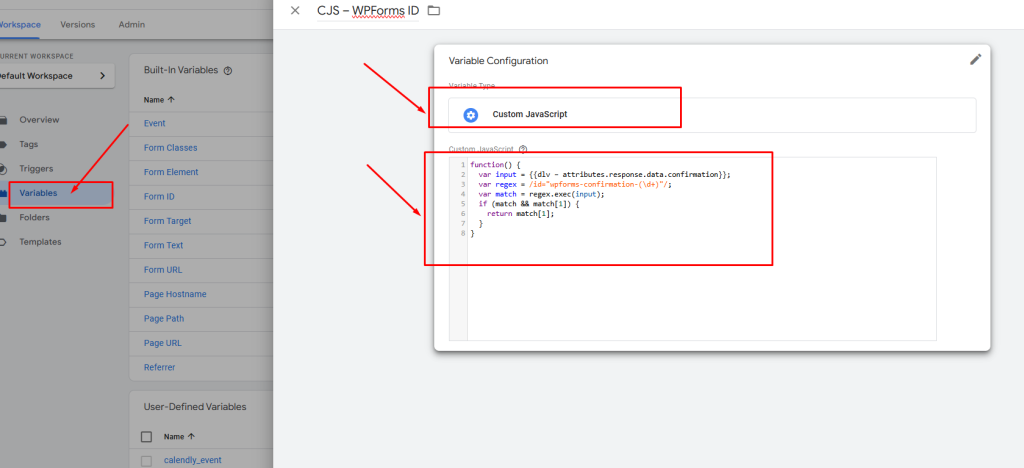
Step 1: Create a Custom JavaScript Variable
Go to Variables > New > Custom JavaScript.
Use the following code:
function() {
  var input = {{dlv – attributes.response.data.confirmation}};
  var regex = /id="wpforms-confirmation-(\d+)"/;
  var match = regex.exec(input);
  if (match && match[1]) {
    return match[1];
  }
}
Save it as “CJS – WPForms ID.”
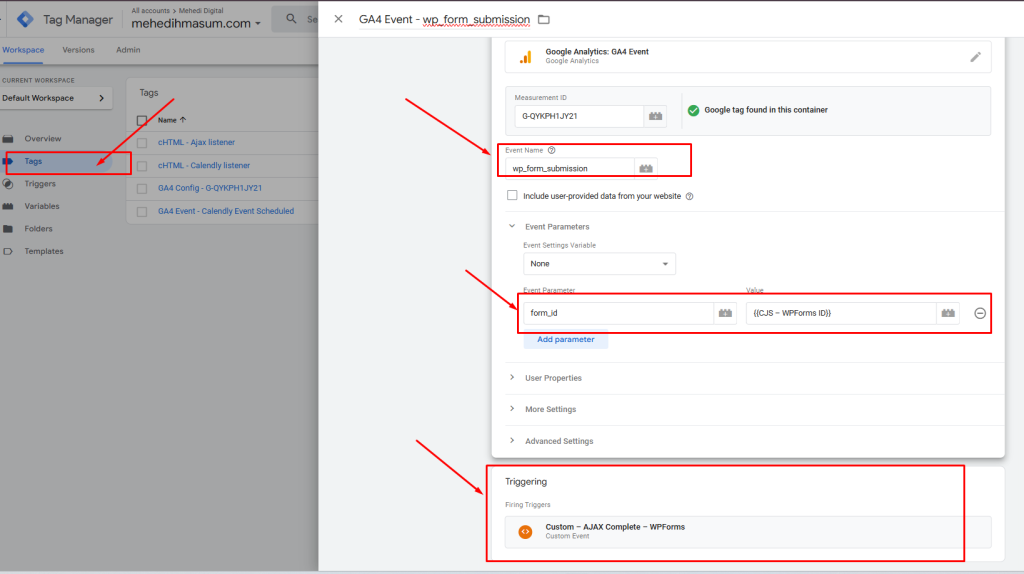
6. Creating the GA4 Event Tag
Step 1: Create a New Tag
Go to Tags > New > GA4 Event.
Set the Measurement ID (use a constant variable for organization).
Add the event name, e.g., wp_form_submission.
Add parameters, such as:
form_id = CJS – WPForms ID.
Step 2: Attach the Trigger
Select the “Custom – AJAX Complete – WPForms” trigger.
Save and publish the tag.
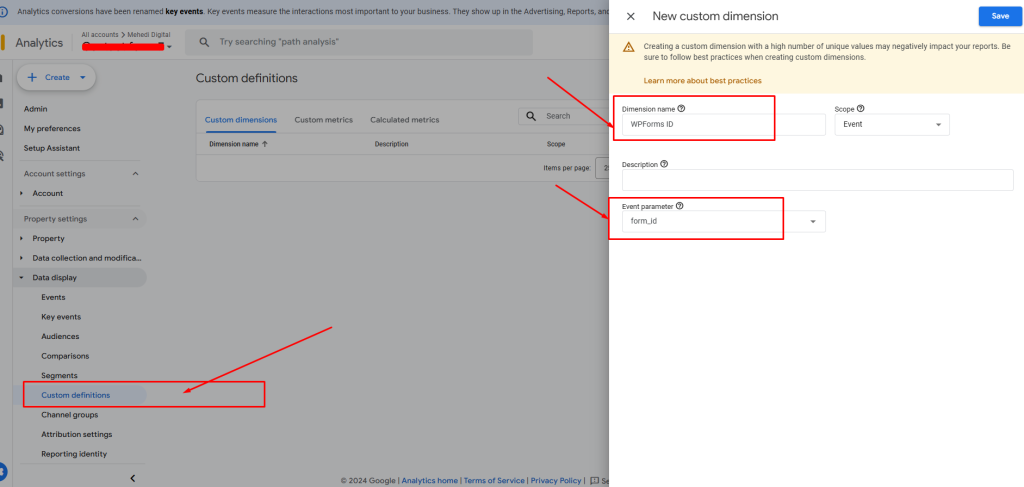
7. Setting Up Custom Dimensions in GA4
To report on form submissions by ID, create a custom dimension in GA4:
Go to Admin > Custom Definitions > Create Custom Dimension.
Set:
Name: WPForms ID
Event Parameter: form_id
Scope: Event
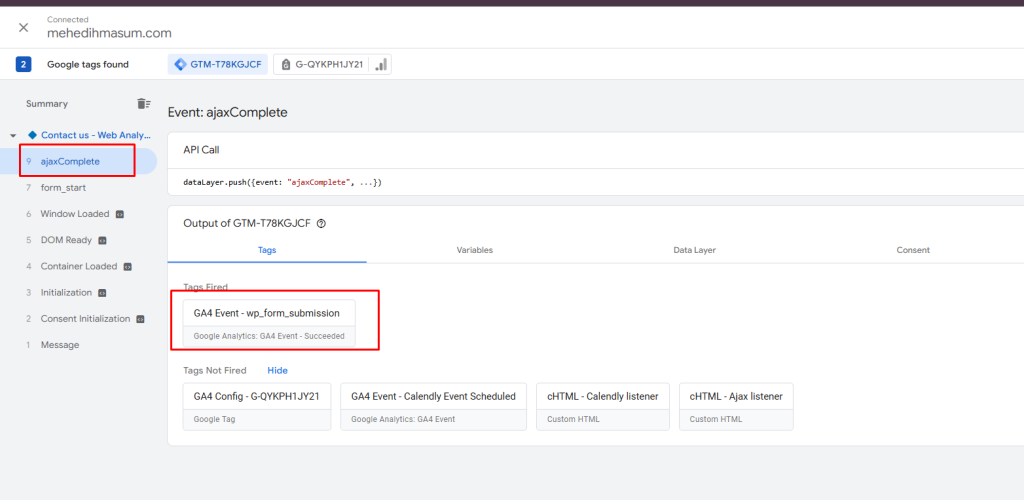
8. Testing Your Setup
Step 1: Use GTM Preview Mode
Submit a WPForm and verify the ajaxComplete event fires.
Ensure your GA4 event tag is triggered and parameters are correctly passed.
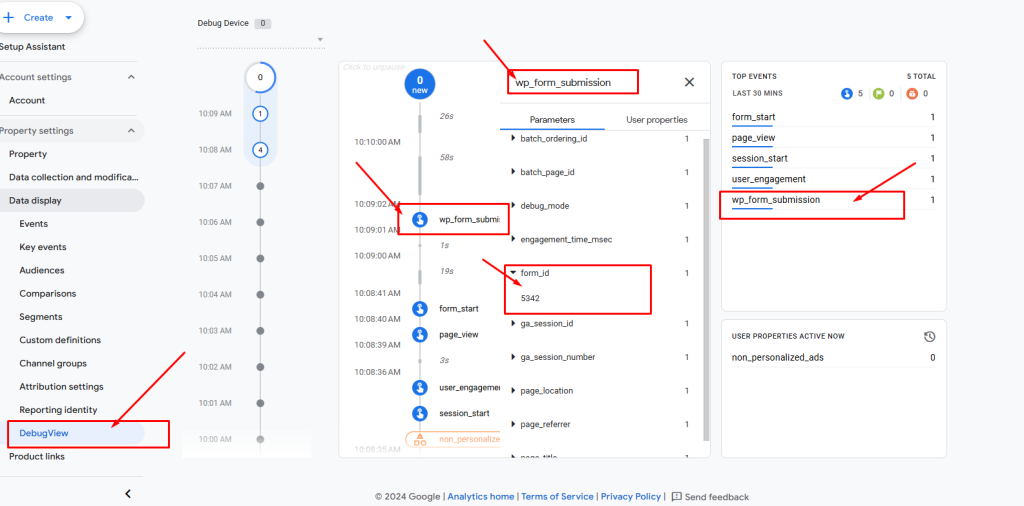
Step 2: Check DebugView in GA4
Go to GA4 > Admin > DebugView.
Confirm the wp_form_submission event appears with the form_id parameter.
By following these steps, you’ll be able to accurately track WPForms submissions in GA4 using GTM. This ensures better insights into your forms’ performance and helps optimize user engagement.
How to Track Calendly Appointment Bookings in GA4 Using Google Tag Manager
Calendly is a popular tool for scheduling appointments, and integrating it with Google Analytics 4 (GA4) allows you to track appointment booking events for better insights and conversion optimization. In this guide, we’ll walk you through the steps to set up Calendly tracking using Google Tag Manager (GTM).
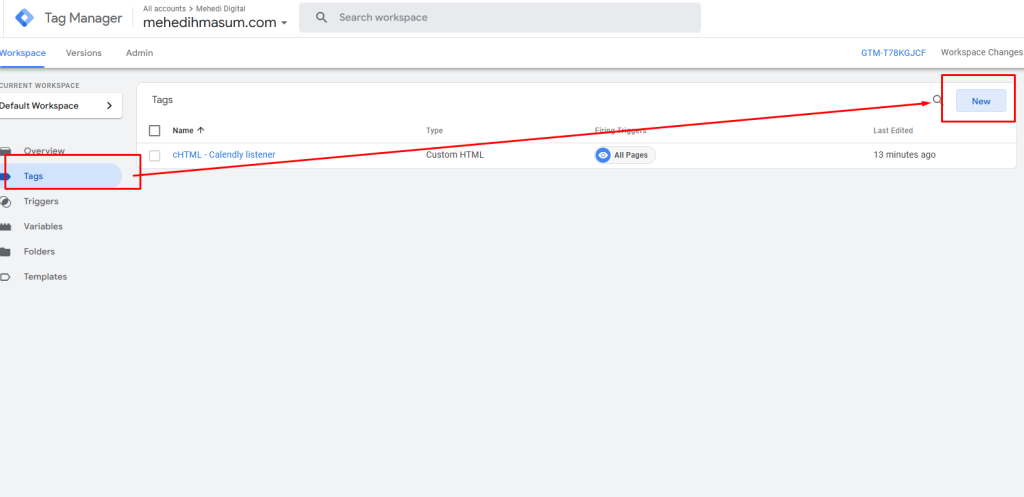
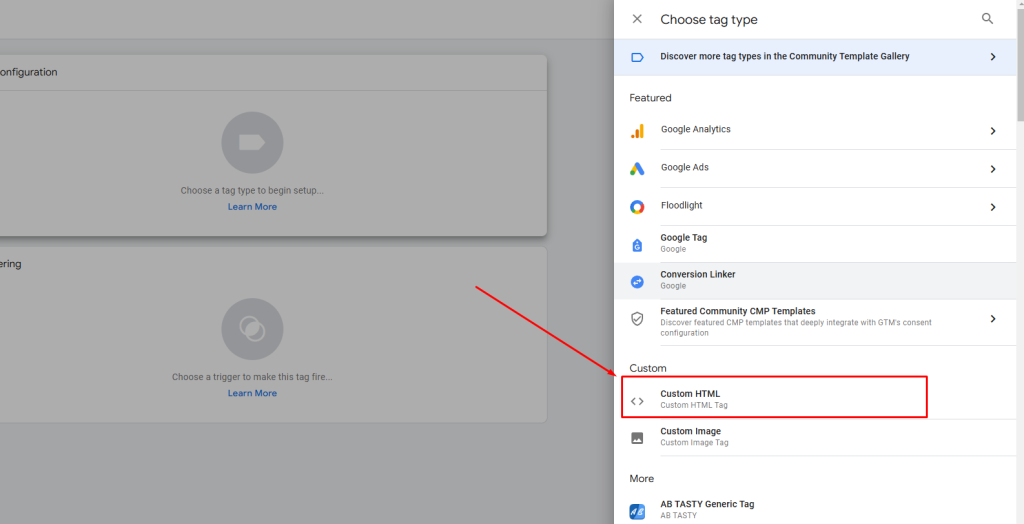
Step 1: Set Up the Event Listener Code in GTM
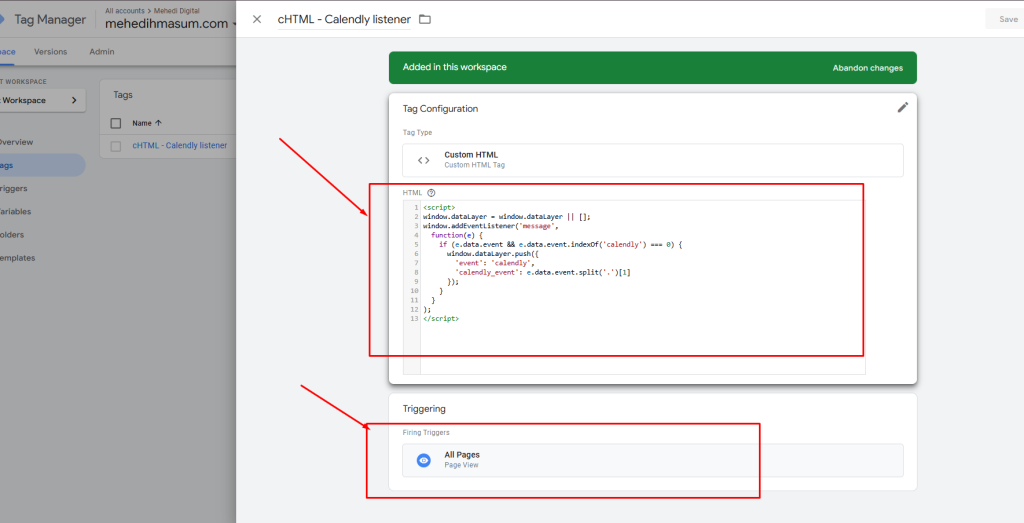
To track Calendly events, you need to add a custom listener code in GTM that detects messages from Calendly and pushes them to the Data Layer.
This listener code listens for messages from Calendly and pushes relevant event data (like calendly.event_scheduled) to the Data Layer.
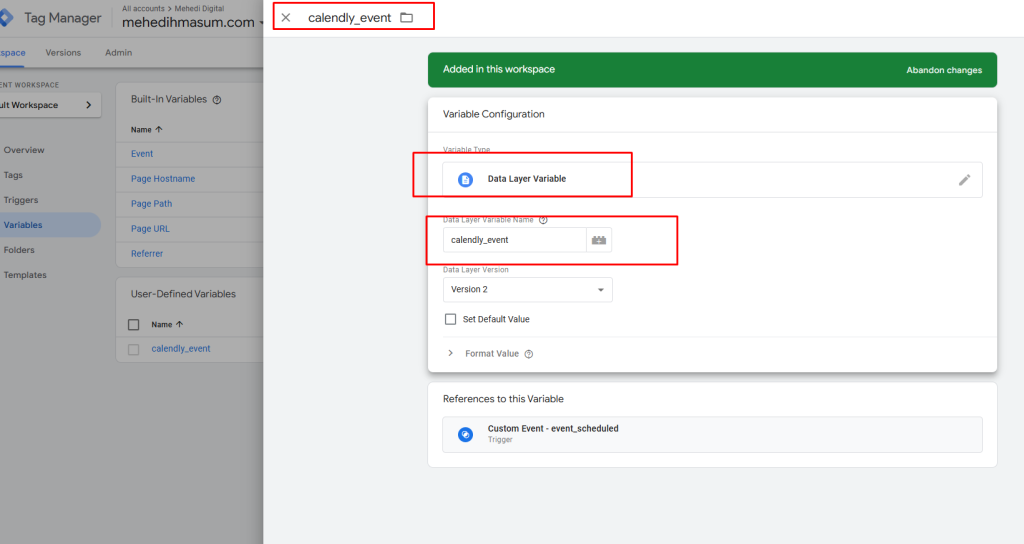
Step 2: Create a Data Layer Variable
To pass the calendly_event value to GA4, create a variable in GTM.
Steps to Create the Variable
Go to Variables > New > Data Layer Variable.
Name the variable, e.g., “Calendly Event”.
Set the Data Layer Variable Name to calendly_event
Save the variable.
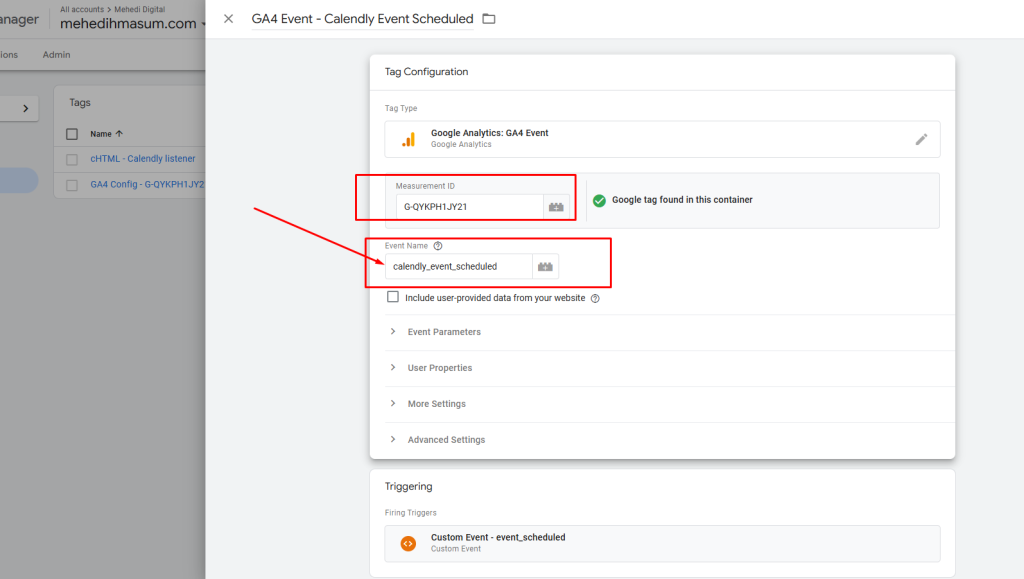
Step 3: Set Up a GA4 Event Tag
Once the listener is in place, you need to create a tag to send these events to GA4.
Creating the GA4 Event Tag
Go to Tags > New > Google Analytics: GA4 Event.
Name the tag, e.g., “GA4 Calendly Event”.
Configure the tag:
Configuration Tag: Select your existing GA4 Configuration Tag.
Event Name: Enter calendly_event_scheduled (or any custom name you prefer).
Event Parameters (optional):
Parameter Name: event_name (or a custom parameter like appointment_status).
Value: {{Calendly Event}} (In step two, we have created calendly_event data layer variables).
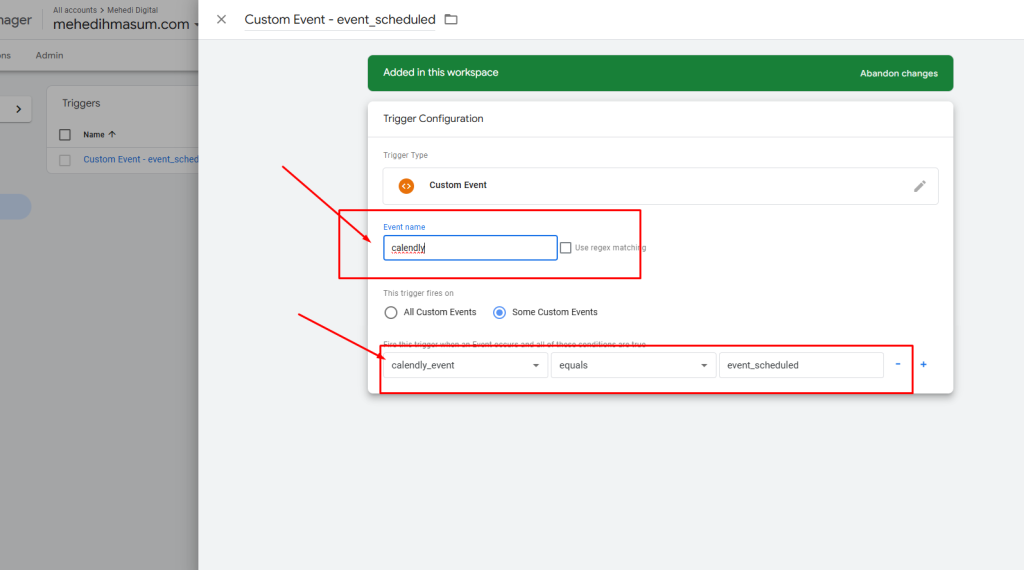
Set the trigger:
Click on Triggering > New > Custom Event Trigger.
Name the trigger, e.g., “Calendly Event Trigger”.
Configure the trigger:
Event Name: calendly.
This trigger fires on All Custom Events or based on specific conditions (e.g., calendly_event equals event_scheduled).
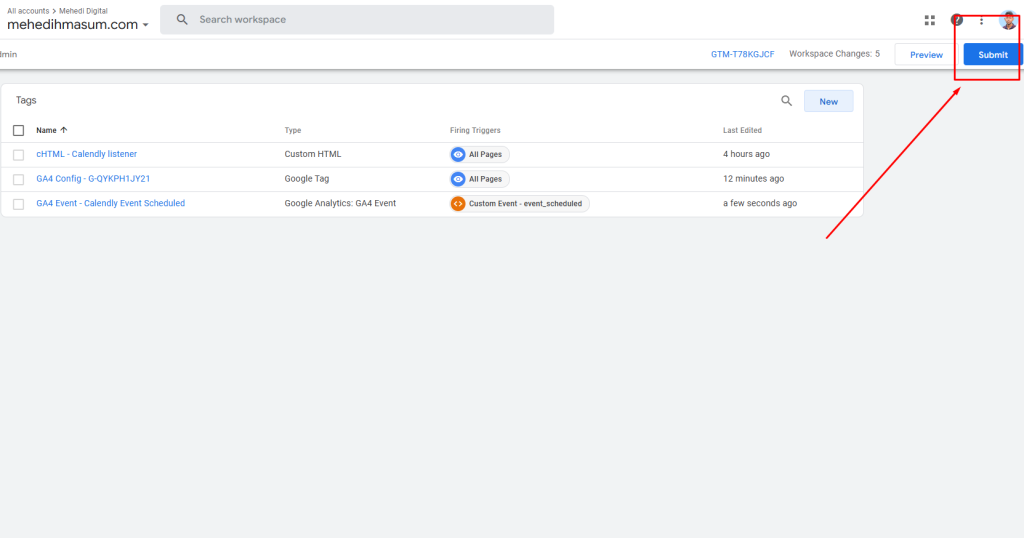
Save and publish the tag.
Step 4: Test the Setup
Testing ensures that the events are being sent to GA4 correctly.
Using GTM Preview Mode
Enable Preview mode in GTM.
Go to your website and perform an action in Calendly, such as booking an appointment.
Check the Preview mode in GTM to ensure the event calendly is pushed to the Data Layer and the GA4 Event Tag is triggered.
Verify in GA4 DebugView
Open your GA4 property.
Navigate to Admin > DebugView.
Look for the calendly_event event and ensure it contains the correct parameters.
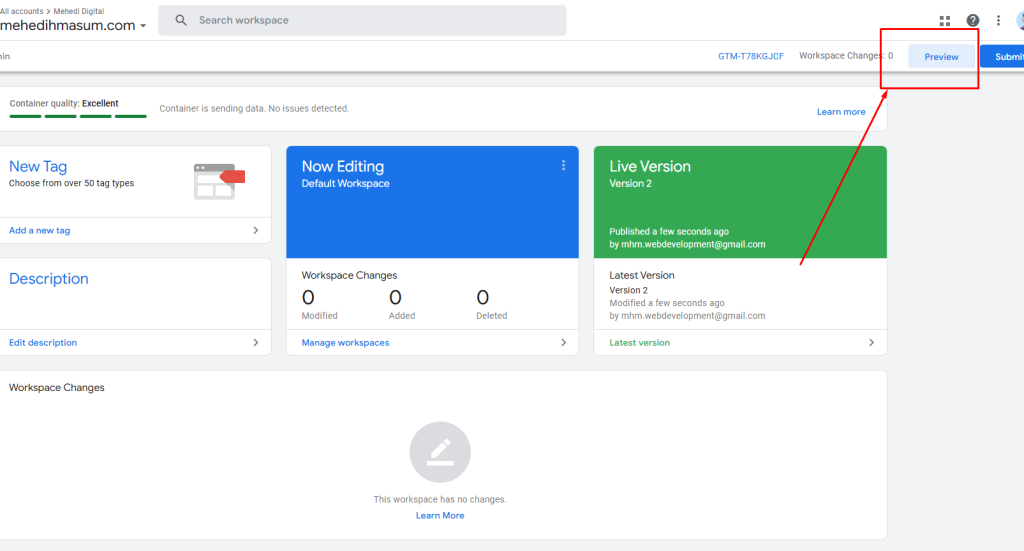
Step 5: Publish the Container
Once you’ve verified that everything works correctly, publish your GTM container.
Conclusion
Tracking Calendly appointments in GA4 provides valuable insights into user behavior and appointment conversions. By following the steps outlined above, you can easily integrate Calendly with GTM and GA4, enabling more effective decision-making based on user interactions.
How to Track WordPress Contact Form 7 Submissions in Google Analytics 4 and Google Ads via Google Tag Manager
Tracking form submissions on your WordPress site is essential to measure user interactions and conversions effectively. In this guide, we’ll walk you through setting up tracking for Contact Form 7 submissions in Google Analytics 4 (GA4) and Google Ads using Google Tag Manager (GTM).
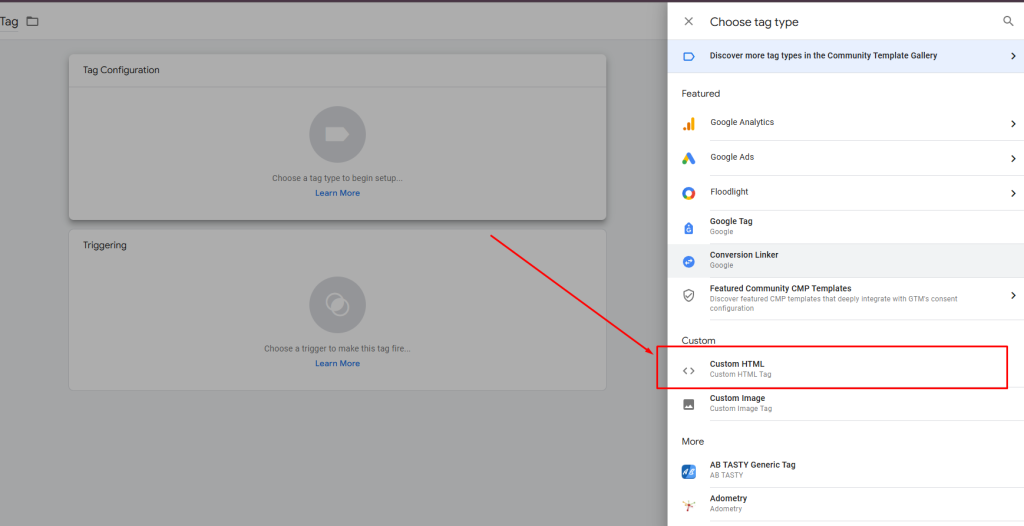
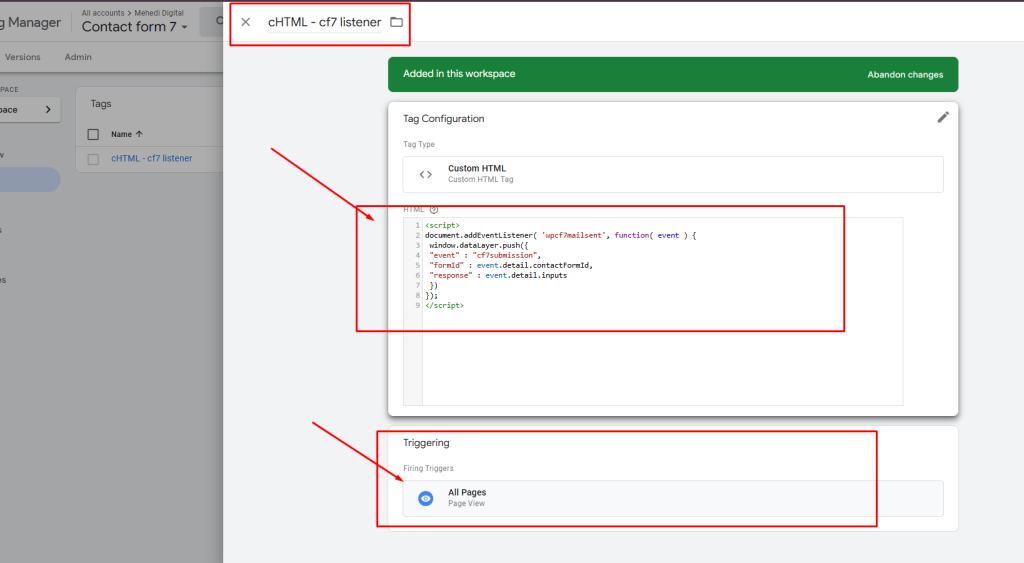
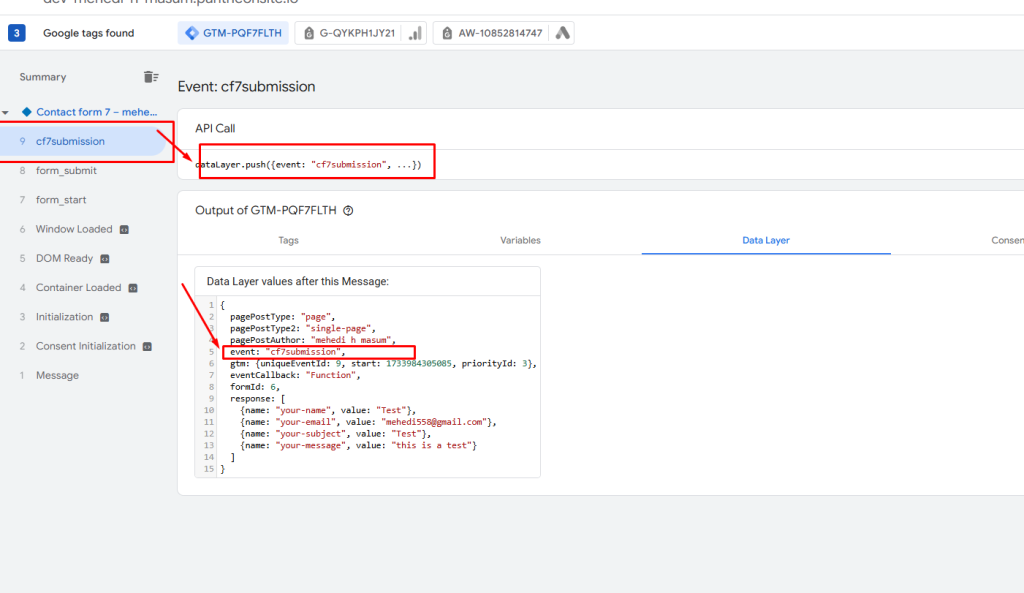
Copy the auto event listener code and paste the code into the Custom HTML Tag
This code pushes an event named cf7submission to the GTM data layer when a form is submitted.
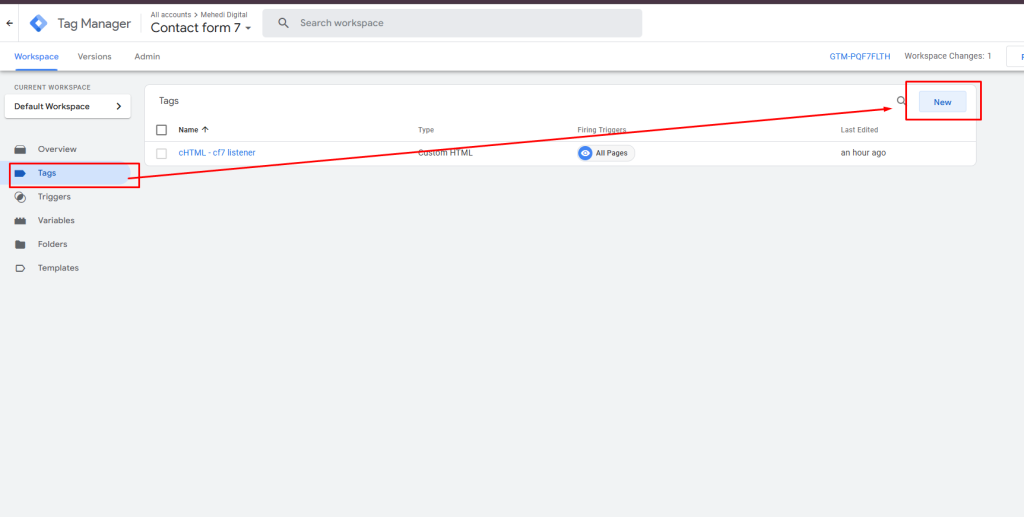
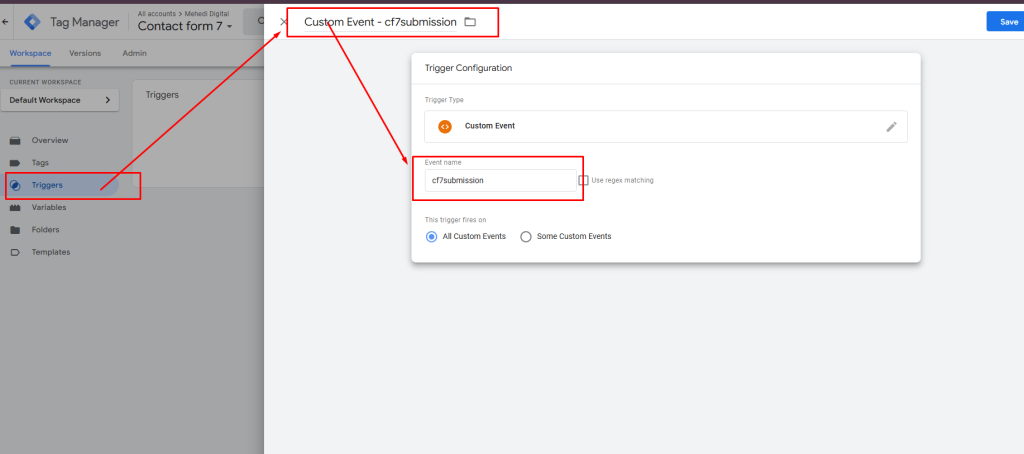
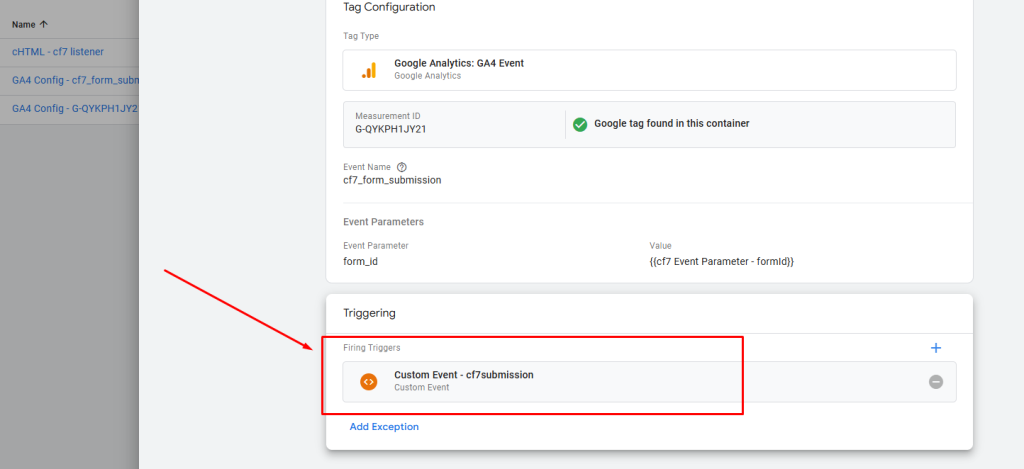
Step 3: Create a Form Submission Trigger in GTM
Open your GTM workspace.
Go to Triggers > New.
Configure the trigger as follows:
Trigger Type: Custom Event.
Event Name: cf7submission
Save the trigger as Contact Form Submission Trigger.
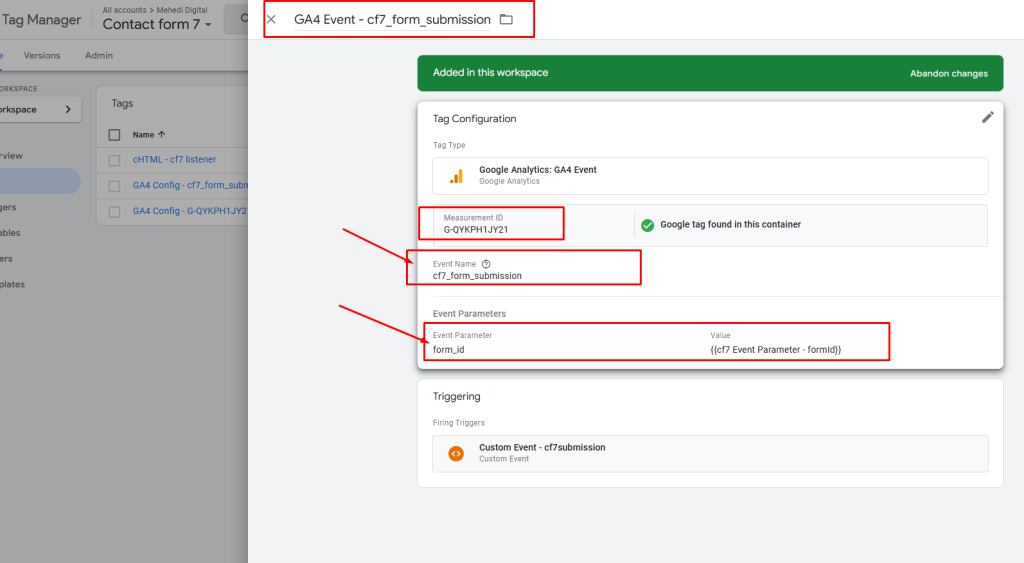
Step 4: Set Up GA4 Event Tracking
In GTM, go to Tags > New.
Create a new tag for GA4:
Tag Type: Google Analytics: GA4 Event.
Configuration Tag: Select your GA4 configuration tag.
Event Name: cf7_form_submission (or any name you prefer).
Add Event Parameters:
form_id: {{cf7 Event Parameter - formId}}
Trigger: Use the Contact Form Submission Trigger created earlier.
Save the tag and publish the changes.
Step 5: Set Up Google Ads Conversion Tracking
Log in to your Google Ads account.
Go to Tools & Settings > Measurement > Conversions.
Create a new conversion action:
Conversion Source: Website.
Define the conversion action (e.g., Form Submission).
Set up a conversion value (if applicable).
Copy the Conversion ID and Label.
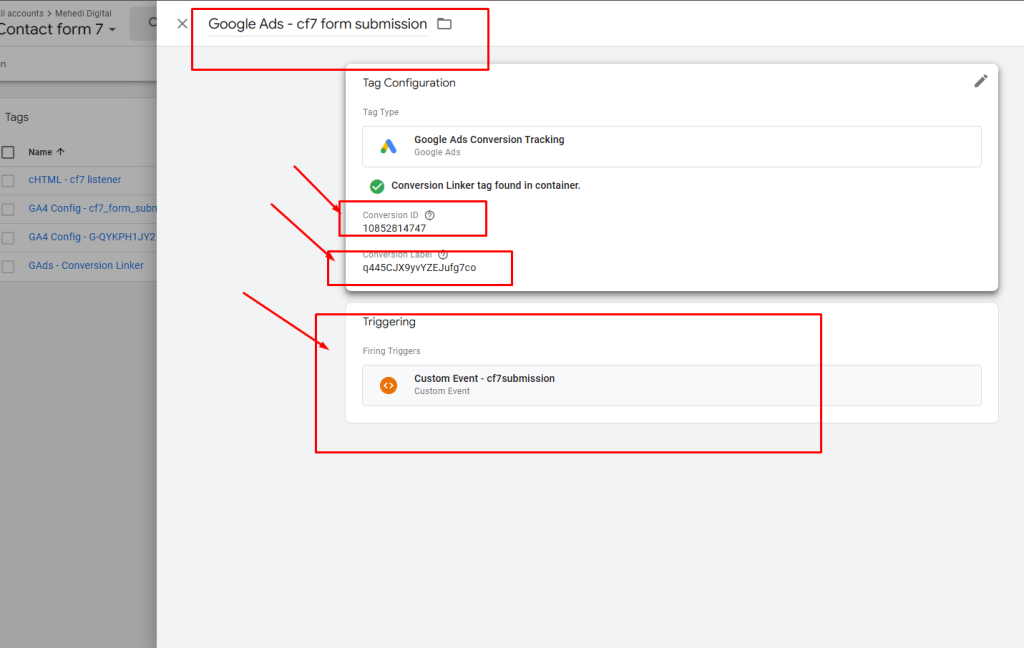
Create a Google Ads Tag in GTM
In GTM, go to Tags > New.
Configure the tag:
Tag Type: Google Ads Conversion Tracking.
Conversion ID and Label: Paste the values from Google Ads.
Trigger: Use the Contact Form Submission Trigger.
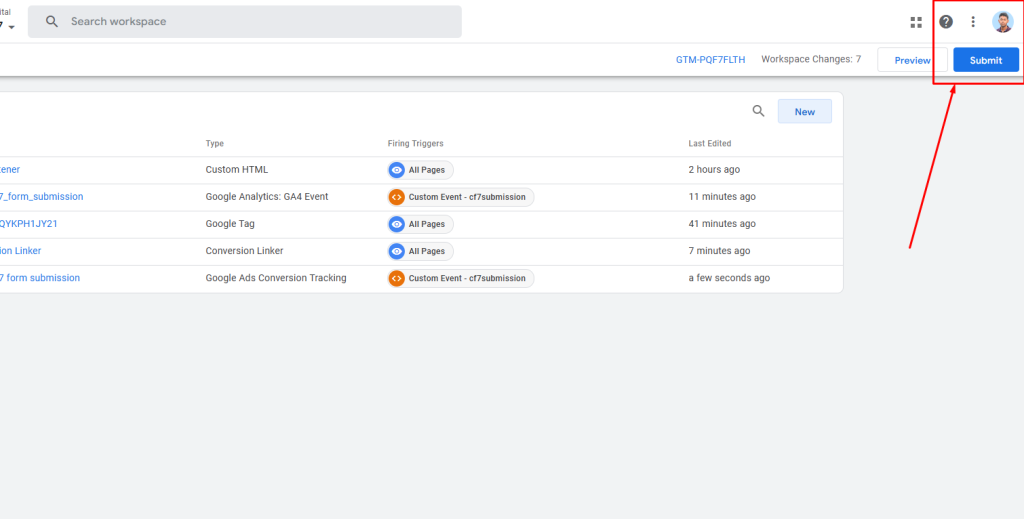
Save the tag and publish the changes.
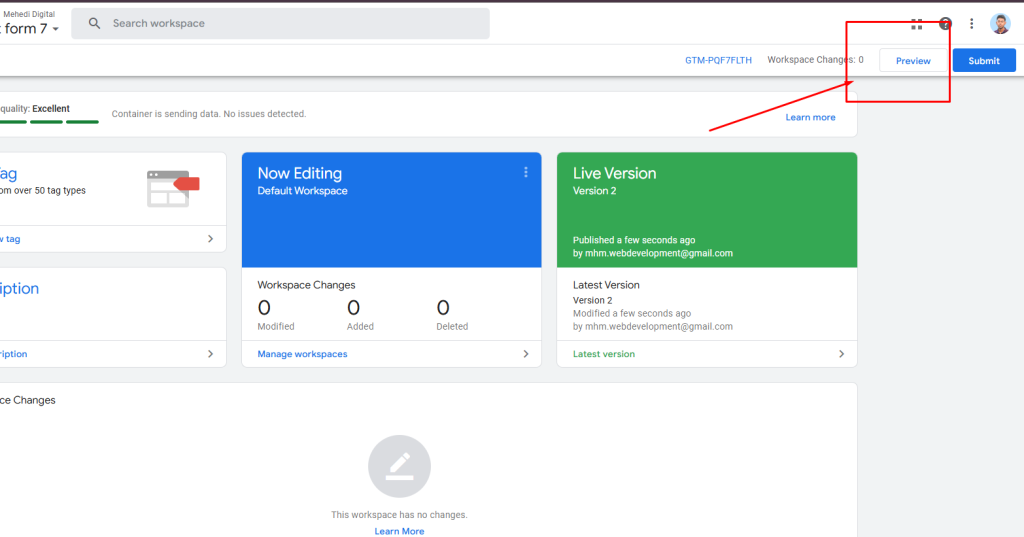
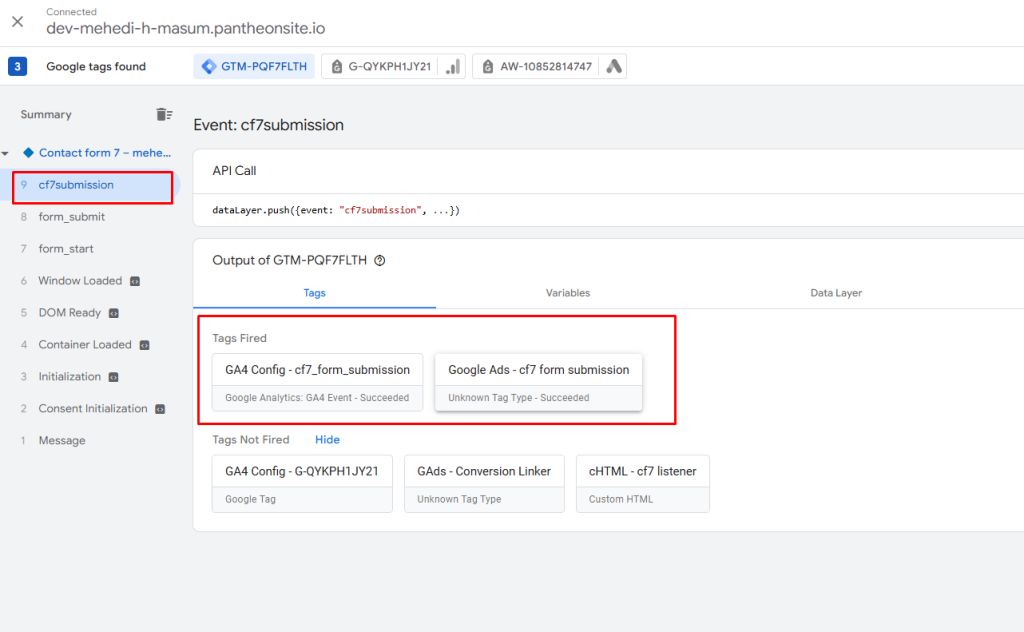
Testing and Debugging
Open GTM and enable Preview Mode.
Submit the Contact Form 7 on your website.
Check if the cf7_form_submission event appears in the GTM debug console.
Verify data in GA4 Realtime reports and Google Ads Conversion Tracking.
Conclusion
Tracking Contact Form 7 submissions using Google Tag Manager allows you
to monitor user interactions efficiently. With GA4 and Google Ads integration, you can measure conversions, optimize campaigns, and improve ROI. Follow the steps outlined in this guide, and ensure proper testing to validate your setup.